

author|Jay Alammar
Translation|Yang Ting, Xu Jiayu
Recently, AI image generation has attracted attention. It can generate beautiful images based on text descriptions, which has greatly changed the way people create images. Stable Diffusion As a high-performance model, it generates higher image quality, runs faster, consumes less resources and occupies less memory, and is a milestone in the field of AI image generation.
After being exposed to AI image generation, you may wonder how these models work behind the scenes.
Below is an overview of how Stable Diffusion works.
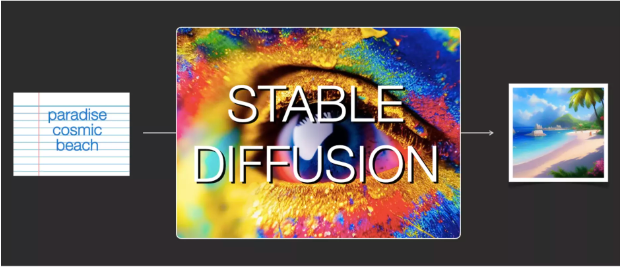
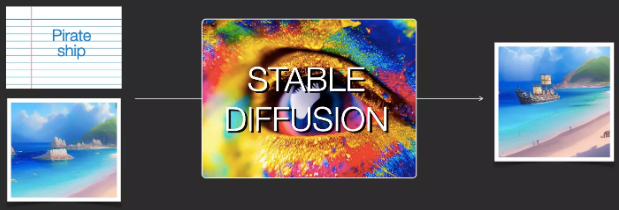
The Stable Diffusion is versatile and is a versatile model. First it can generate images from text (text2img). The image above is an example from text input to image generation. In addition, we can also use Stable Diffusion to replace and change images (we need to enter text and images at the same time).
The following is the internal structure of Stable Diffusion. Understanding the internal structure allows us to better understand the composition of Stable Diffusion, how each component interacts, and the meaning of various image generation options/parameters.
1
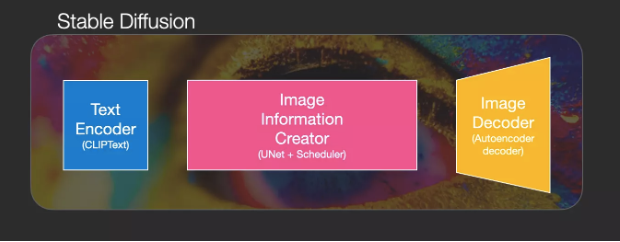
Composition of Stable Diffusion
Stable Diffusion is not a single model, but a system composed of multiple parts and models.
From the inside, first we can see a text understanding component, which converts text information into a numeric representation to capture text intent.

This part mainly gives a general introduction to ML, and more details will be explained later in the article. It can be said that this text understanding component (text encoder) is a special Transformer language model (strictly speaking, it is a text encoder of the CLIP model). Input the text to the Clip text encoder to get a list of features, and for each word/token in the text, a vector feature will be obtained.
The text features are then used as input to the image generator, which in turn consists of several parts.
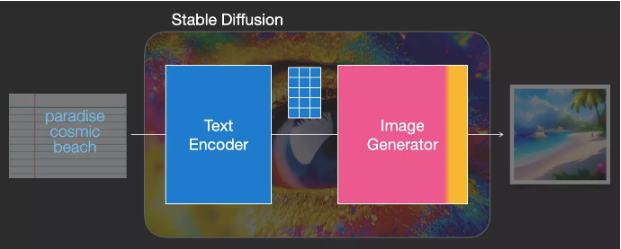
Image generator two steps:
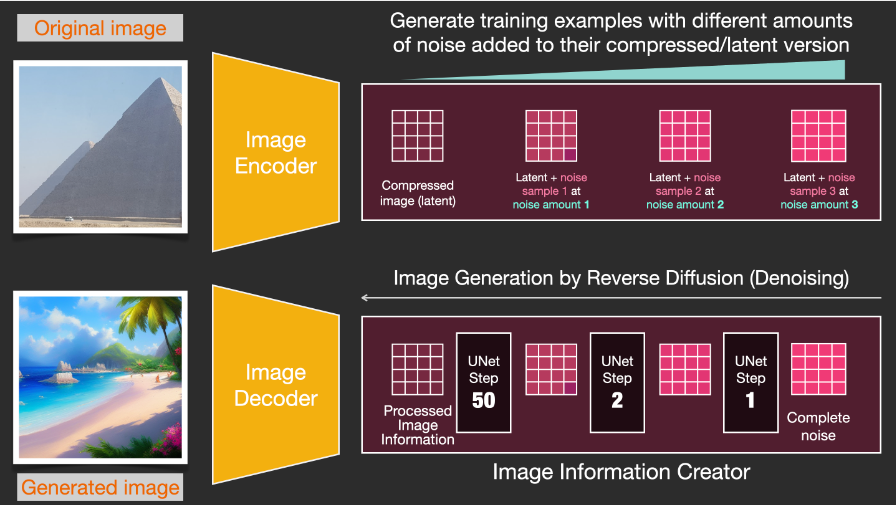
1- Image information creator (Image information creator)
The Image Info Creator is a key part unique to Stable Diffusion and the reason why it outperforms other models by far.
The image information creator runs multiple steps to generate image information. The step parameters of Stable Diffusion interfaces (interfaces) and libraries (libraries) generally default to 50 or 100.
The image information creator operates entirely on the image information space (also known as the latent space), which makes Stable Diffusion faster than previous diffusion models that operate on pixel space. Technically, the image information creator is composed of UNet neural network and scheduling algorithm.
The word “diffusion” describes what happens in the image information creator. Because the image information creator processes the information step by step, the image decoder can then produce high-quality images.
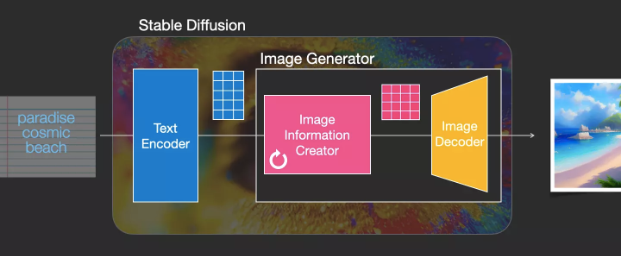
2- Image decoder (Image Decoder)
The Image Decoder draws the image based on the information from the ImageInfoCreator, it only needs to be run once at the end of the process to generate the final pixel image.
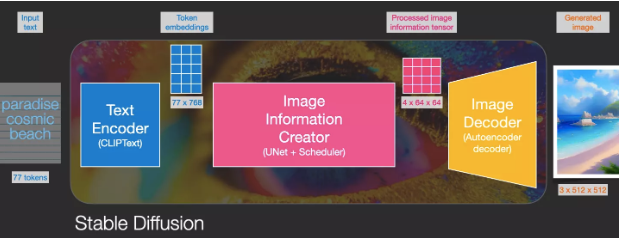
This constitutes the three main components of Stable Diffusion, each with its own neural network:
ClipText: For text encoding. Input: text. Output: 77 token embeddings vectors, each with 768 dimensions.
UNet+Scheduler: Process information step by step in the information (latent) space. Input: text embeddings and an initialized multidimensional array (structured list of numbers, also known as a tensor) consisting of noise. Output: An array of processed information.
Autoencoder Decoder: Uses the processed array of information to draw the final image. Input: processed information array (dimensions: (4,64,64)) output: generated image (dimensions: (3,512,512), ie (red/green/blue; width, height)).
2
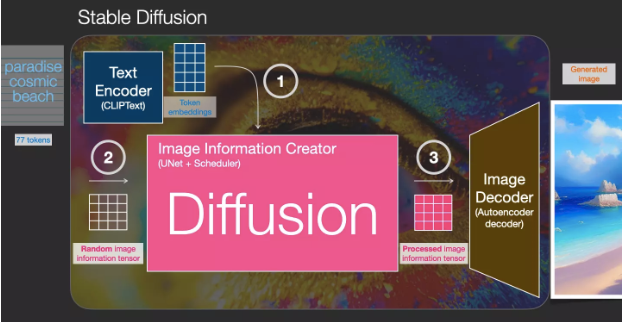
What exactly is Diffusion?
Diffusion is the process that takes place in the Pink Area Image Info Creator component. This part has a token embeddings representing the input text and a randomly initialized image information array, these arrays are also called latents, an information array will be generated in this process, and the Image Decoder uses this information array to generate the final image.
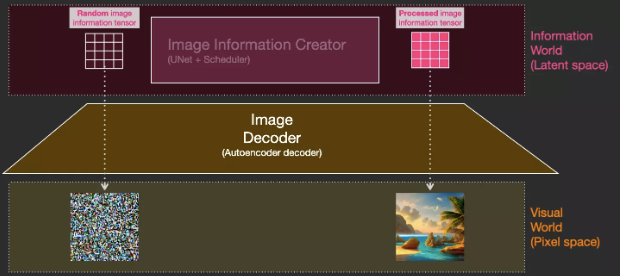
Diffusion happens step by step, with each step adding more relevant information. To get a little more intuition about this process, we can check the random latents array to see if it translates into visual noise. In this case, visual inspection (Visual inspection) is carried out through the image decoder.
Diffusion is divided into steps, each of which operates on the input latents array and produces another latents array that is more similar to the input text and all the visual information the model has captured in all the images the model was trained on.

We can perform a visualization on a set of such latents arrays to see what information is added at each step. The process is breathtaking.

Video link:
In this case, something particularly interesting happens between steps 2 and 4, as if the silhouette is emerging from the noise.
3
How Diffusion works
At the heart of Diffusion Model image generation is a powerful computer vision model. Based on sufficiently large data sets, these models can learn many complex operations. Diffusion models achieve image generation by framing the problem as follows:
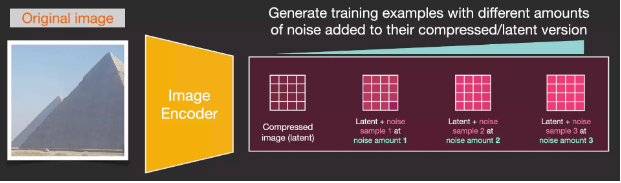
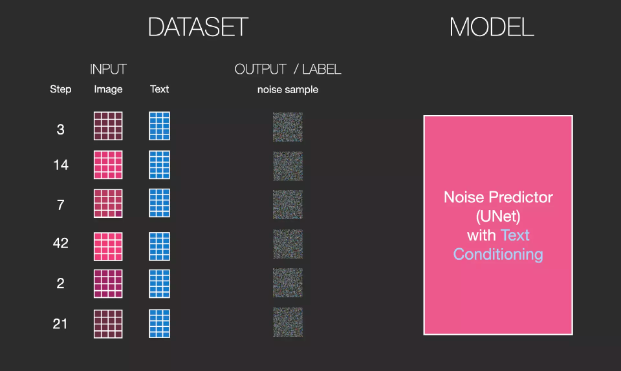
Suppose we have an image, we first generate some noise (noise), and then add this noise to the image.
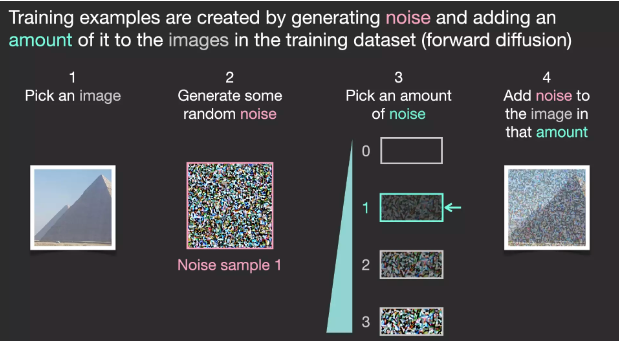
We can think of this as a training example. We then use the same formula to create more training examples, and then use these examples to train the central components of the image generation model.
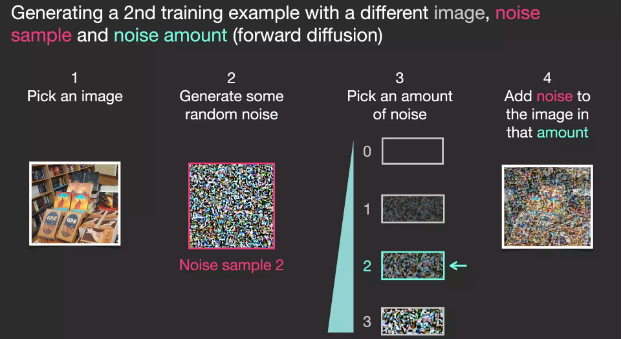
While this example shows some noise values from the image (total 0, no noise) to the total noise (total 4, total noise), we can easily control the amount of noise we add to the image, so we can divide it into Dozens of steps create dozens of training examples for each image in the dataset.
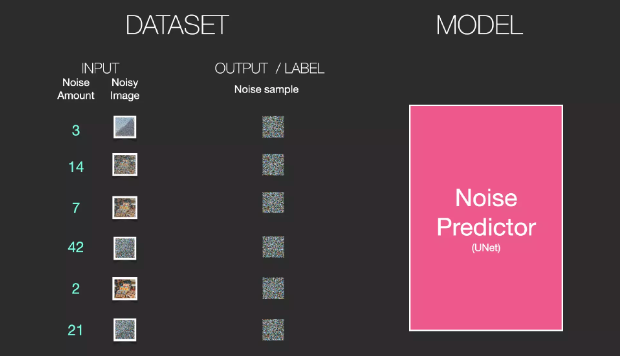
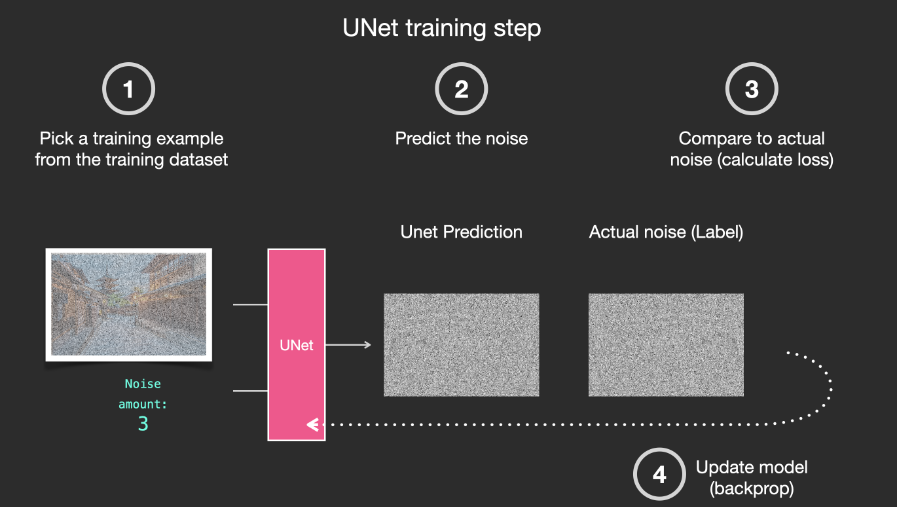
With this dataset, we can train a noise predictor and end up with a predictor that creates images when run on a specific configuration. Those who have been exposed to ML will find the training steps very familiar:
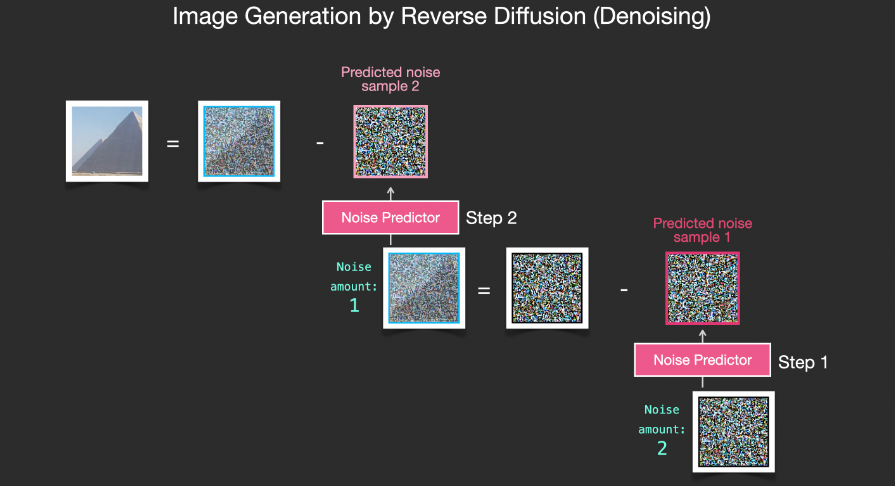
Next, let’s take a look at how Stable Diffusion generates images.
4
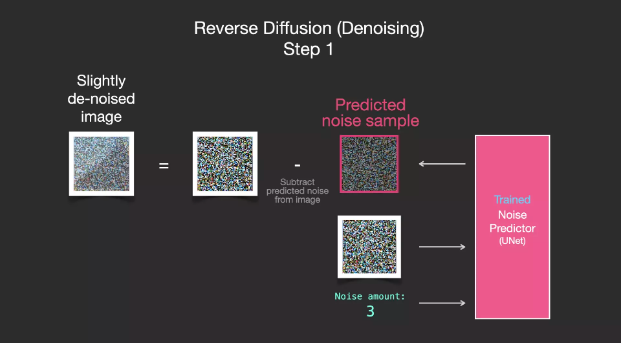
Drawing with noise reduction
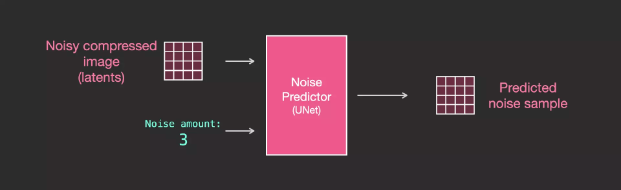
A trained noise predictor can denoise noisy images and can predict noise.
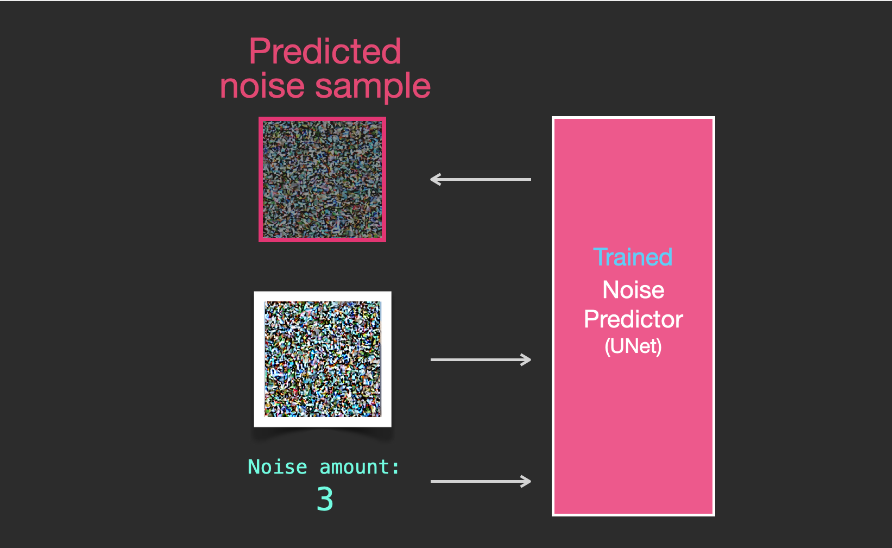
Because sampled noise is predicted, if we remove this sample from the image, we get an image that is closer to the image the model was trained on. (This image is not the exact image itself, but the image distribution, which is the pixel arrangement of the image, in which the sky is usually blue, is higher than the ground, people have two eyes, cats have pointy ears and are always lazy lazily).
If the images in the training data set are more beautiful, such as those trained by Stable DiffusionLAION Aesthetics , Then the viewability of the trained images will be higher. If we train it on logo images, then we end up with a logo generative model.
Here is a summary of how the diffusion model handles image generation, mainly as described in the paper Denoising Diffusion Probabilistic Models. I believe you have a certain understanding of the meaning of diffusion, and know the main components of Stable Diffusion, Dall-E 2 and Google Imagen.
It is worth noting that the diffusion process we have described so far does not use any text data, and simply runs the model to generate beautiful images. We have no control over the content of the image though, it could be a pyramid, or it could be a cat. Next, we discuss how to incorporate textual information into the diffusion process to control image types.
5
Speed Improvement: Diffusion in Compressed (Latent) Data
To speed up the image generation process, the Stable Diffusion paper does not operate on pixelated images, but on compressed versions of the images. The paper calls this Departure to Latent Space.
Compression (followed by decompression/drawing) is done through the encoder. The autoencoder uses the Image Encoder to compress the image into the latent space, and then uses the Image Decoder to reconstruct the compressed information.
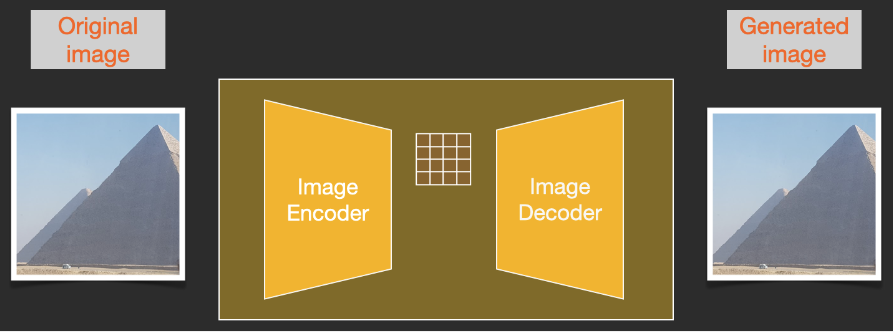
Forward diffusion is done on the latent space. The noise information is applied to the latent space, not to the pixel image. Therefore, training a noise predictor is actually to predict the noise on the compressed representation, which is also called the latent space.
Forward diffusion is to use Image Encoder to generate image data to train the noise predictor. Once training is complete, backdiffusion can be performed to generate images using Image Decoder.
These two processes are mentioned in Figure 3 of the LDM/Stable Diffusion paper:
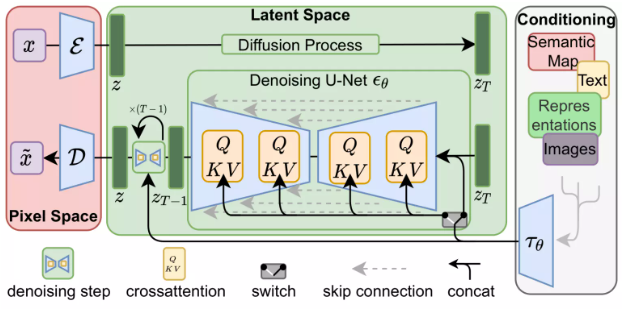
The image above also shows the “conditioning” component, which in this case is text prompts describing the images generated by the model. Next, we move on to the text component.
6
Text Encoder: A Transformer Language Model
As a language understanding component, the Transformer language model can accept text prompts and generate token embeddings. The Stable Diffusion model uses ClipText (a GPT-based model), while BERT is used in the paper.
The Imagen paper shows that the choice of language model is quite important. A larger language model component has a greater impact on the quality of the generated images than a larger image generation component.
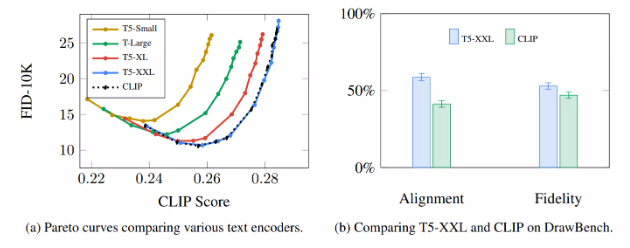
Larger/better language models have a huge impact on the quality of image generative models. Source: Figure A.5 in Google Imagen by Saharia et al.
The early Stable Diffusion model only used the pre-trained model ClipText released by OpenAI. Future models may move to the newly released larger CLIP variant, OpenCLIP. (Updated in November 2022, for details see Stable Diffusion V2 uses OpenClip . OpenCLIP has 354 million text model parameters compared to ClipText which only has 6.3 million text model parameters. )
7
How to train CLIP
The CLIP model is trained on the image and image caption datasets. We can imagine a dataset with 400 million images and the material these images illustrate.
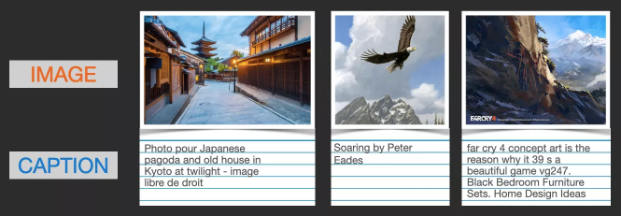
Image and Image Caption Dataset
In fact, CLIP is trained on images with “alt” tags grabbed from the web. CLIP is a combination of an image encoder and a text encoder. In simple terms, training CLIP consists of encoding images and text descriptions of images separately.
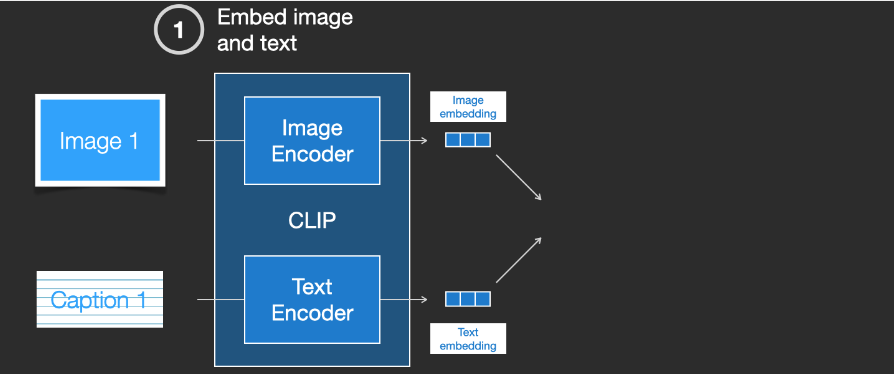
Then, the generated embeddings are compared using cosine similarity. At the beginning of training, even if the text correctly describes the image, the similarity will be low.
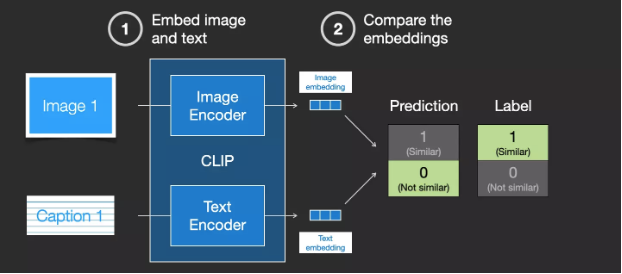
We update both models so that we get similar embeddings the next time we embed them.
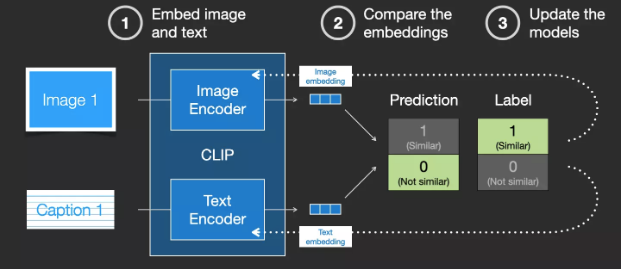
By repeating this operation on the dataset and using a large batch size, the encoder is finally able to generate similar embeddings for images and text captions.Such as word2vec the training process also needs to include mismatched images and text captions as negative samples to get lower similarity scores.
8
Incorporating textual information into the image generation process
In order to incorporate text into image generation, we have to adapt the noise predictor to input text.

Now, add text to the dataset. Because we are operating in a latent space, both the input image and the predicted noise are in the latent space.
In order to better understand how textual tokens are used in UNet, below we will further explore the UNet model.
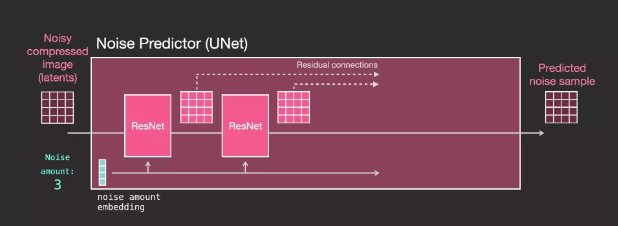
Layers of the Unet noise predictor (text not used)
First look at UNet that does not use text. Its input and output are as follows:
can be seen:
UNet is a series of layers used to transform arrays of latents
Each layer operates on the output of the previous layer
Some of the outputs are fed (via residual connections) into the processing later in the network
Through residual connections (residual connections), the output of the layer in front of the network is sent to the layer behind for processing
The time step is converted into an embedding vector and used in the network layer
Layers (with text) in the Unet noise predictor
Now let’s see how to change this system to increase the focus on the text.
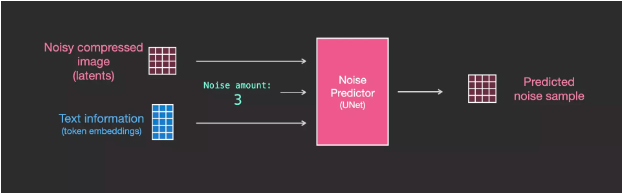
In order to provide support for text input, which is professionally known as text conditioning, we need to add an attention layer between the ResNet blocks of the system.
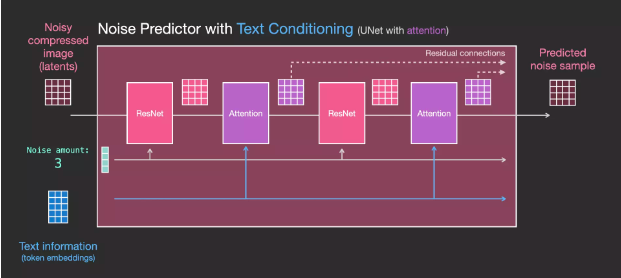
Text information is not directly processed by ResNet, but these text representations are incorporated into latents through attention layers. In this way, the next ResNet can utilize the incorporated textual information during processing.
9
Summarize
I hope this article can help you gain a deeper understanding of how Stable Diffusion works. There are many other concepts involved, but once you are familiar with the above sections, these concepts will become easy to understand. Below are some resources that I found useful.
resource
https://www.youtube.com/shorts/qL6mKRyjK-0
https://huggingface.co/blog/stable_diffusion
https://huggingface.co/blog/annotated-diffusion
https://www.youtube.com/watch?v=J87hffSMB60
https://www.youtube.com/watch?v=ltLNYA3lWAQ
https://ommer-lab.com/research/latent-diffusion-models/
https://lilianweng.github.io/posts/2021-07-11-diffusion-models/
https://www.youtube.com/watch?v=_7rMfsA24Ls
(This article follows theLicensed under CC BY-NC-SA 4.0Compiled and published by OneFlow, please contact us for authorization to reprint the translation.original:Alammar, J (2018). The Illustrated Transformer [Blog post]. https://jalammar.github.io/illustrated-stable-diffusion/)
everyone else is watching

This article is shared from the WeChat public account – OneFlow (OneFlowTechnology).
If there is any infringement, please contact support@oschina.cn to delete it.
This article participates in the “OSC Source Creation Program”, and you are welcome to join in and share it together.
#pictures #intuitive #understanding #Stable #Diffusion #Personal #space #OneFlow #deep #learning #framework #News Fast Delivery